mida del dibuix
Inkscape
és un programa d'edició vectorial. Els vectors són escalables. No
importa com petit o com de gran dibuixar els objectes. No obstant això,
si utilitzes el teclat per a la navegació, a continuació, algunes
opcions són rellevants. Per defecte Inkscape s'estableix en una mida de
pas de 2 píxels per al moviment amb les tecles de fletxa. Si dibuixa
objectes grans de debò, i després moure amb les tecles de fletxa en
l'ajust de pas per defecte no és fàcil. Podeu canviar els paràmetres
per defecte en les preferències de l'Inkscape que s'obre al menú
Fitxer> Preferències de l'Inkscape (drecera: Ctrl + Shift + P).
Per a la seva informació: La configuració per defecte de Inkscape és un document de mida A4 (defecte dels documents) i l'alçada total dels ninos ha de ser un 25% de l'alçada del paper,
i l'el · lipse inicial pendrà prop de 20% de l'alçada del paper. Però
com vaig dir abans ... en realitat no importa ja que tot és escalable.
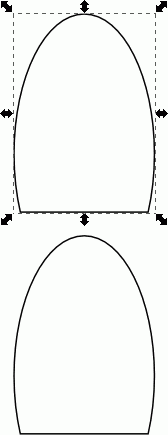
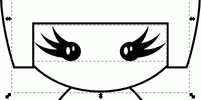
Forma bàsica de la nina Kokeshi
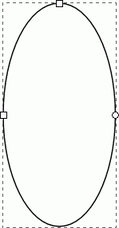
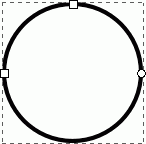
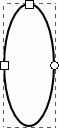
Seleccioneu l'eina El · lipse![]() de la caixa d'eines a la part esquerra de la finestra de l'Inkscape. Aquesta eina s'utilitza per dibuixar cercles, el · lipses i arcs.
de la caixa d'eines a la part esquerra de la finestra de l'Inkscape. Aquesta eina s'utilitza per dibuixar cercles, el · lipses i arcs.
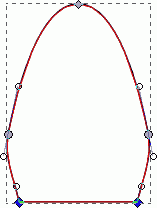
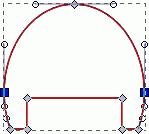
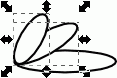
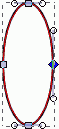
Amb l'eina El · lipse seleccionada, feu clic a qualsevol part del dibuix i premeu el botó esquerre del ratolí, arrossegueu el ratolí per dibuixar una el · lipse. Mentre l'eina El · lipse està activa, i una el · lipse seleccionada, podràs veure algunes nanses que permeten convertir el canvi de mida (els costats) i l'arc (el petit cercle).
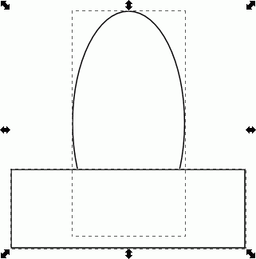
Ara, de la mateixa manera selecciona l'eina Rectangle ![]() y pinta un rectangle sobre la part inferior de l'el · lipse.
y pinta un rectangle sobre la part inferior de l'el · lipse.
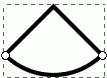
La manera per crear la forma bàsica
Per fer la forma bàsica de la nina kokeshi, s'utilitza una operació de traçat per tallar la part inferior de l'el · lipse.
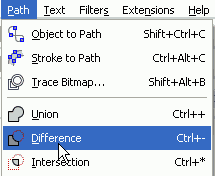
- Usa l'eina de selecció
 i seleccioneu dos objectes. Per seleccionar diversos objectes: arrossegar una finestra de selecció al voltant dels dos objectes, o seleccioneu un objecte i premeu la tecla Maj per afegir un altre objecte a la selecció.
 - Seleccioneu la diferència de camins> al menú principal. Alternativament, pot utilitzar la combinació de tecles Ctrl + - (premeu la tecla Ctrl i premeu la tecla -). Això crearà una diferència de dos camins (l'objecte del fons menys l'objecte superior).

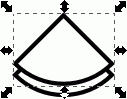
L'objecte resultant s'utilitzarà per a 2 formes: el cos principal, així com el cabell. Així que hem de crear un duplicat.
- Seleccioneu Edició> Duplica al menú principal (drecera Ctrl + D). El duplicat es crearà exactament sobre de l'original (centre mateix punt).
- Moveu l'objecte superior pressionant la tecla de fletxa cap amunt fins que els dos objectes estan separats. Alternativa: arrossegament cap amunt d'objectes amb el ratolí mentre prem la tecla Ctrl al moviment de restricció vertical.
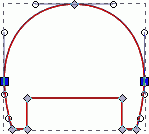
Ara hauras de tenir el següent dibuix:
Forma del cos
Next we need to modify the shape for the body a bit.
The Node Tool ![]() is used to modify paths. When we used the
Path Operation on the ellipse earlier, the ellipse object was converted
to a path automatically for us.
is used to modify paths. When we used the
Path Operation on the ellipse earlier, the ellipse object was converted
to a path automatically for us.
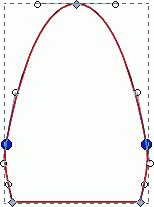
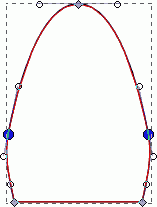
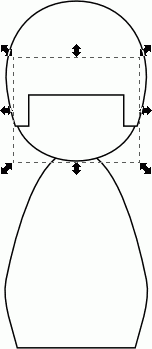
- Select the Node Tool and make sure that the lower object on screen is selected. You should see 5 markers that indicate nodes.
Note that the ones at the top and bottom of the path show as a diamond, whilst the middle ones show as a square. This is an indication for the type of node. The diamond nodes are corner nodes, and allow sharp corners / peaks in paths. The square ones are smooth nodes and make the path more flowing. There are other type of nodes "symmetric" and "auto-smooth". It is very easy to switch between the different types of nodes, and we will make use of that.
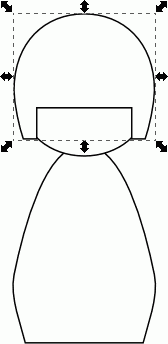
- Select the 2 nodes in the middle (drag a selection window - or select a node and add node(s) to selection with shift + click, similar as selecting multiple objects before).
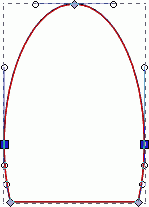
- Click on the "auto-smooth nodes" button
 on the Node Tool - Tool Control bar at the
top of the screen. Now the shape looks pretty close to the desired body
shape we're after.
on the Node Tool - Tool Control bar at the
top of the screen. Now the shape looks pretty close to the desired body
shape we're after. - With the nodes still selected use the Arrow-keys to nudge the nodes a bit upwards, see picture below.
- Then select the bottom nodes and move them a bit closer to each other (scale inwards) by hitting the < key on the keyboard a few times, see picture below. The shape of the body is now exactly as needed.
There are many options to edit or 'sculpt' a path using the Node Tool and if you are new to Inkscape I'll advise you to read "Editing Paths" in Inkscape: Guide to a Vector Drawing Program by Tavmjong Bah.
Forma del cabell
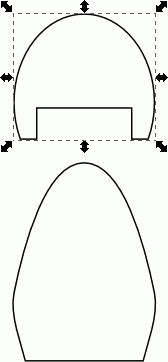
Now for the hair. The shape is basically OK, but it is a bit too high.
- Select the object with the Selection Tool and use the scaling handle at the top-centre
to scale the height of the object down.
- Use the Rectangle Tool
 to draw a rectangle on top of the hair
shape, and make the width smaller than the width of the bottom of the
hair shape.
to draw a rectangle on top of the hair
shape, and make the width smaller than the width of the bottom of the
hair shape.
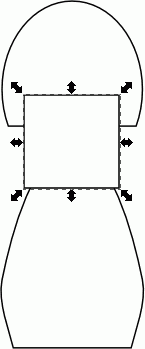
The shapes must be alligned before the next step.
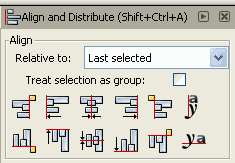
- Open the "Allign and Distribute" dialog with the
 button in the top toolbar or use the
shortcut Shift+Ctrl+A.
button in the top toolbar or use the
shortcut Shift+Ctrl+A.
As the hair object is already exactly alligned with the body, it is easiest to move just the rectangle.
- Select first the rectangle - it probably is still selected - and then add the hair shape to the selection: hold down the Shift-key and click on the hair shape.
- In the "Allign and Distribute" dialog, set the "Relative to" drop down box to "Last Selected".
- Click on the button
 to center the objects horizontally.
 - Use Path > Difference (shortcut: Ctrl+-) again to cut out the square from the hair shape.
Your drawing should now look like this:
Ajust asdicional de la forma dels cabells
The hair shape can be improved a bit by using the Node
Tool![]() :
:
- Select the 2 nodes in the middle with the Node Tool and move them a bit upwards with the Arrow-keys.
- Select the 2 outer nodes at the bottom with the Node Tool, and move them a bit closer to each other by hitting the < key.

La cara
Time for the face.
- Draw a slightly squashed ellipse with the Ellipse
Tool
 .
. - Allign the ellipse horizontally with the centre of
the hair by using the "Allign and Distribute" dialog . This is similar as before: select the
ellipse, add the hair shape to the selection as last object and allign
the centres by pressing "Allign Centers Horizontally" .
- The face object needs to be behind the hair. Move the object behind the hair by pressing the Page Down-key. This changes the z-order (the stacking) of vector objects on a layer.
- Move the hair object vertically if needed, it should cover most of the face.

Ojos
Kokeshi dolls come with many different looks. Eyes open, eyes closed, winking or not, stars or not and so on. The details on the face give the dolls their character. It is simple to create an open eye with beautiful lashes. We use a simple circle and combine that with a bezier curve that has a pattern along its path, in this case a triangle.
Note: do not worry about the size of the eye yet. We scale it after we complete drawing. The advantage of a vector program is that the graphics are scaleable at all times without loss of quality.
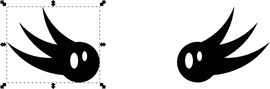
Pestanyes
- Find an empty space on the canvas.
- Select the Bezier Tool
 . Set the mode to "Create regular Bezier
path" (it is probably set like that) and set the shape to "Triangle In"
on the tool controls. The settings should look like this:
. Set the mode to "Create regular Bezier
path" (it is probably set like that) and set the shape to "Triangle In"
on the tool controls. The settings should look like this:
![]()
- Draw the Bezier path:
- Find an empty space on the canvas.

- Click on the canvas and hold the mouse button down
whilst moving in the direction where you want the curve to go. This
sets the control handle for the Bezier path (direction). In this case
the mouse was moved to the right.

- Release the mouse button and move the mouse a bit
upwards, a preview of the curve is shown in red.

- When the curve looks good, click again to fix the
node. The curve is shown in green.

- As we are happy with this curve, we finish it by
hitting enter on the keyboard (or click with the right mouse button).

Under the hood Inkscape applied a pattern to a path, all in one step. This is great, but when you start scaling or rotating them, some unexpected effects may occur. For that reason,we convert the object to a path. This will apply the path effects permanently.
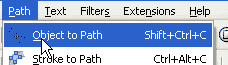
- Use Path > Object to Path from the main menu.
Els Ulls
- Draw a small circle next to the eyelash with the
Ellipse Tool . Hold down the Ctrl-key to scale
symmetrically.
- Zoom in (Ctrl + mouse wheel) if you need a better view. The parts for the eye should look like this.
- Move the eye-lash on top of the circle.
- Rotate the eye-lash if needed: click on the object untill the rotation handles appear, then drag the appropriate one to rotate the object.
- Duplicate the eye-lash (Ctrl+D). Remember that the duplicate is created exactly on top of the original, so move/rotate again
- Repeat these steps for a 3rd eye-lash.

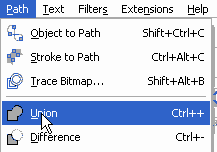
- Select all eye-lashes and the circle (use the selection methods as explained before) and then select Path > Union (shortcut: Ctrl++) to union the 4 objects into a single one.
- Set the fill to black: click with the left mouse button on the black swatch in the colour palette at the bottom of the screen.
- Remove the stroke (outline), if any, by holding down the Shift-key while clicking on the X in the colour palette. This will make the eye a bit sharper.


Reflexes dels ulls
Now let's put some sparkles in that eye.
- Draw 2 small vertical ellipses on top of the eye and fill them with white.

- Select the 3 objects (eye + 2 sparkles), and duplicate (Ctrl+D) them.
- The duplicates are automatically selected, use the arrow keys to move them to the the side so you can see both eyes.
- Now select ONLY the eye (click elsewhere on the canvas to deselect all, then click on the black eye object), the sparkles should stay where they are.
- Flip the object horizontally by clicking on this
button
 in the tool control bar.
 - Use the arrow keys to move the eye-object horizontally so that the sparkles are over it again.
Note: sparkles are to come from the same light source, so while there is a right and a left eye, the sparkles appear at the same side of an eye, and in the same order.
- Group each eye with its sparkles: select the 3 objects and use Object > Group from the main menu (shortcut: Ctrl+G).
- Select the 2 grouped eye objects and move them over the face. Use the scaling handles to resize if needed, and move them closer or further apart as needed.
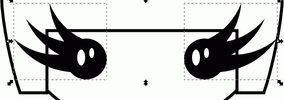
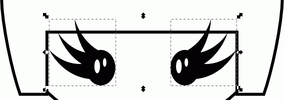
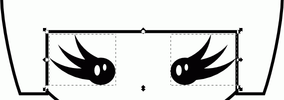
- When the eyes are at the desired location, group them (Ctrl+G).
- Open the allign dialog if it's closed by clicking . Align the eyes with the centre of the
face by using . Remember: select the eyes first, then add
the face to the selection as that is the object you want to allign with
(Last Selected).
Note: as you can see I make use of multiple groupings, one for an individual eye object (eye + sparkles) and then for the competed set of eyes. This allows easy movement, rotation and alignment.
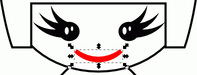
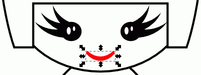
Boca
There are again many ways to draw the mouth of a Kokeshi doll. From a simple horizontal line, a circle or ellipse, moon shape or even heart shape, everything is possible. For this tutorial we create the mouth by using a pie shape.
- Select the Ellipse Tool and draw a small circle, if you see no outline: make sure that a colour for the stroke is assigned (Shift + click on a colour in the palette).
- With the circle selected, change the settings at the top of the screen for start to 45 and end to 135. This should result in a nice pie shape.
![]()
- Duplicate the pie shape (Ctrl+D), and use the arrow key to move the duplicate a bit upwards.
- Select both shapes and again use Path > Difference (shortcut: Ctrl+-) from the main menu. This results in a nice shape for the mouth.
- Move it into place and center it horizontally with the face (use the align tools like before).
- Set the fill to a red colour and remove the stroke colour.
- Scale the mouth to your likings, hold down the Shift-key to scale from the centre point.
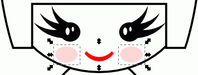
Ruboritzat
An optional step, but it makes the dolls soooooo cute.
- Draw 2 simple circles or ellipses left and right and
slightly below the mouth. Reset the tool if it's not a full circle by
using
 .
. - Make sure they are horizontally alligned, then group them and allign them horizontally with the face.
- Apply a pink colour.
- Open the "Fill and Stroke" dialog by pressing
 on the command bar (shortcut: Shift+Ctrl+F),
and set "Blur" to 3-5% (to your liking).
on the command bar (shortcut: Shift+Ctrl+F),
and set "Blur" to 3-5% (to your liking).
Donar colors emplenant els objectes creats
- Seleccioneu el cabell i fixeu l'emplenamenta negre.
- Seleccioneu la cara i la poseu d'un color blanc trencat o beige
- Seleccioneu el cos i seleccioneu un color al seu gust pel quimono.
Recordeu: establir un farciment d'un objecte seleccionat amb un sol clic amb el botó esquerre del ratolí sobre un color de la paleta a la part inferior. Seleccioneu un color per al traç (contorn) mantenint la tecla Shift cap avall i després fer clic a un color. Eliminar farcit o el traç d'una manera similar fent clic a la X en l'inici de la paleta.
Més detalls
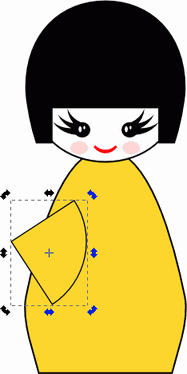
Sleeves
- Sleeves of the kimono are easily formed by quartered circles.
- Draw a circle, set the start to 0 and the end to 90.
- Place the shape on top of the body, rotate the segment to your likings.
- Give the sleeve a fill matching the kimono.
- Duplicate the sleeve (Ctrl+D) and flip horizontally.
- Move the sleeve to its location with the arrow keys.
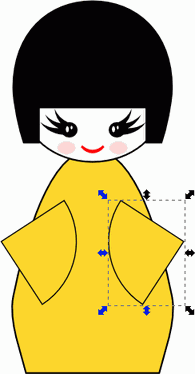
Use the allign tools if needed to create symmetry. For example, allign the inner sides of the sleeves with the inner sides of the blush shapes by selecting both shapes and allign right sides and allign left sides respectively. You may need to temporarily ungroup the blush (use Shift+Ctrl+G), like below. Regroup after that (Ctrl+G).
Monyo
- Create a small circle or ellipse for a bun on the top of the head. Remember: the Ctrl-key scales uniformly.
Dedcoració de les mànigues
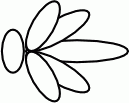
A lotus flower made out of ellipses is used to decorate the sleeves.
- Draw a small horizontal ellipse.
- Duplicate the shape, and scale it down a bit: hold down the Shift-key and the Ctrl-key, to scale uniformly from center. I squashed the ellipse a bit horrizontally before rotating it.
- Rotate the ellipse 30 degrees (hold down the Ctrl-key to force rotation in steps).
- Repeat these steps (with the original ellipse, as that scales easier), scale to a smaller size and rotate 60 degrees.
![]()
![]()
- Select the 2 rotated elipses and allign them with the
left edge of the original one. Remember: select the objects to allign
first, the object you want to allign with as last (Last Selected). Use
the Allign and Distribute dialog (which is probably still open) and allign
with the left edge using this button
 .
. - Nudge them a bit vertically with the arrow keys so it appears they start at the middle of the original object.
- Duplicate the 2 rotated ellipses.
- Flip them vertically and nudge them in place.
- Draw a vertical ellipse for the bottom of the lotus.
- Give the lotus a fill and strokes to your liking.
- Group the lotus object (Ctrl+G) and place it on the sleeve.
- Duplicate (Ctrl+D) and flip horizontally for the other side.
Decoració del cabell
Draw some circles as decoration on the hair, and draw a few for decoration of the kimono too. Flowers, swirls and dots are great to decorate the dolls. Check out my Japanese flower design tutorial to see how beautiful flower objects can be created.
Kimono
The collar of the kimono is formed by 2 simple Bezier
paths ![]() with the shape set to "Ellipse". Draw from
the right side of the neck to the left sleeve and then a smaller one
from the left side till it crosses the first path.
with the shape set to "Ellipse". Draw from
the right side of the neck to the left sleeve and then a smaller one
from the left side till it crosses the first path.

Change both objects to path (Path > Object to Path) to apply the path effect permanently. Scale and rotate if needed to move them to the best location. Give the objects a matching fill and stroke colour. Use the Page Down key until the object moves behind the sleeve and face.
Reflexos
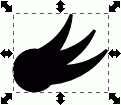
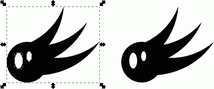
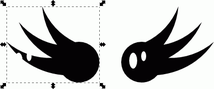
The Kokeshi dolls are traditionally made of wood, and often finished with a shining laquer. To make the vector drawing a bit more lively, you can create 2 bean shapes that present some highlights.
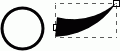
Create an ellipse. Convert to path via Path > Object to Path. Select the outer node and nudge it a bit inwards.
![]()
![]()
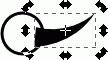
Fill with white, remove stroke and place it at an appropriate place. Take note on how the sparkles for the eyes were placed, use the same direction. There are probably some other places that would look good with a highlight, but I think this is fine.
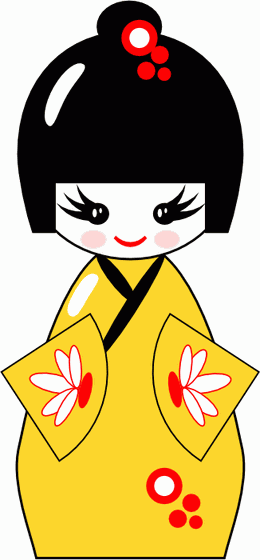
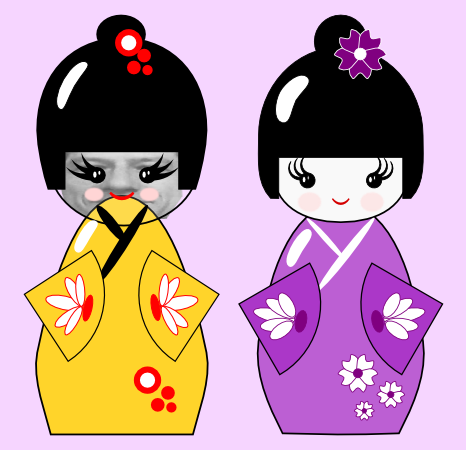
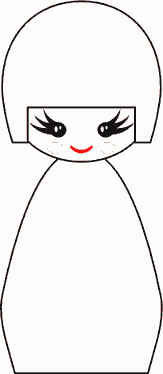
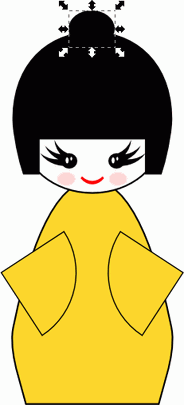
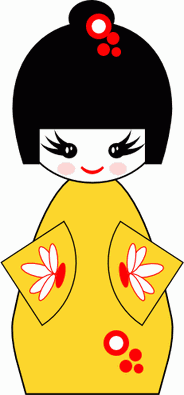
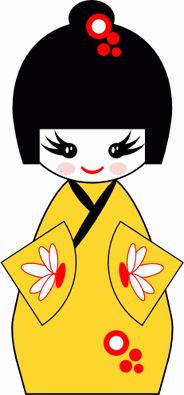
Y això és tot en aquest tutorial, esperem que amb les dificultatts t'hagis crescut. Aquest podria ser una imatge per pujar al teu blos amb la teva cara de fons: